Friday, June 17, 2011

Jailbreak your way

Never had I tried to tinker with my ipod touch because I don’t how much it will cost me if I totally mess up with it. Haha! But anyway, last week while I was listening on my itouch, it suddenly froze on the home screen while the music is still playing. It doesn’t even respond to any touch and the bg light just dims when it suppose to lock up already. So when we got home, I remembered what my friend told me when my itouch froze before, I tried to hard reset it(holding down the sleep/wake button and home button at the same time) or whatever it is called hoping it would come back to life after. So it opened up again JUST to show the apple logo and THATS IT. =(


FROZEN on the apple logo screen:

Just what I’ve said awhile ago, I’m not used to tinkering with my itouch so I just waited for my kuya to go home. He suggested to just restore it because there’s no other way already, meaning I would lose ALL my files (plus those games I spent time with to finish the levels!) and jailbreak will be gone. Huu! But the other problem is Itunes doesn’t recognize so no way can I restore it and kuya doesn’t also know what to do. After days of not able to use it, I just decided to do it my way. Bahala na! Haha! Hello Google, my friend! =]

After researching this is what I did to get Itunes to recognize my itouch and restore:

1. Plug in your itouch to your computer
2. HOLD the home and sleep key till the itouch turns off and turns on again to show the apple logo.
3. RELEASE both buttons WHEN YOU HEAR the chime sound in your computer telling you that your itouch is ALREADY CONNECTED and ready to restore.
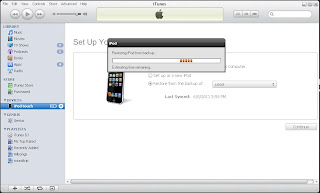
4. Then click RESTORE. And sit back and relax for awhile. Hehe. This would take about an hour or more.
*NOTE: Do this only if there’s no other way. =]
After restoring, my firmware is updated to 4.1. Everything is back to zero. And so moving on to my next task: JAILBREAKING

Jailbreaking an ipod touch 2nd gen IOS 4.1:

This would be my very first attempt to jailbreak an itouch. I was very unsure about doing this because it might damage my itouch if it went wrong, but based on the forums I’ve read it’s not that hard and you can do it again if it doesn’t work on your first try. So I googled the best jailbreak tool for a 2nd gen IOS 4.1 and stumbled on “greenpois0n rc4”

Steps:
1. Plug in your itouch again. Download greenpois0n to your computer. (I can’t open the greenposi0n site so I just downloaded it here)
2. After installing, unzip it and run.
3. Turn off your itouch. Click “Prepare to Jailbreak (DFU)”. Follow the instructions and everything will be fine. =]
4. After doing it right, “Ready to Jailbreak” message will be shown, click it and wait for it to finish.
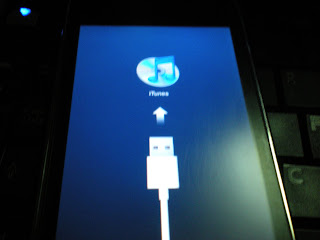
*Your screen will be white and then will change to this
And codes will scroll down like this. After the codes stop your itouch will reboot.
5. After successfully jailbreaking it, you will see the Loader app on your home screen. Open it and install Cydia.
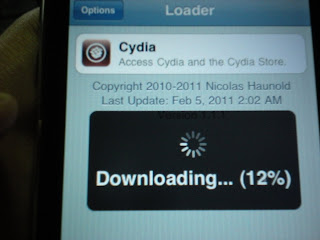
6. After installing, a message will pop out asking you if you want to remove your Loader app. Click remove. Then plug out your itouch.
7. Then it’s done. Yey! ^______^

Here’s a video I found in youtube that can help.

Some Cydia apps that you may find useful:
· dTunes: for downloading music
· Winterboard: for customizing your theme
· MxTube: for streaming or downloading videos from youtube
· Installous: download apps like in the app store (you first need to add “hackulo.us” repository in your Cydia to have this)

Tuesday, June 7, 2011

as easy as 1-2-3

Yesterday was a very, very productive day. Woohoo! It felt like I was already preparing for a job though I still have a year to finish my degree. Lol. So I accompanied Kathy yesterday to get an SSS number, TIN and a student permit at LTO. I also decided to get an SSS number for myself too for future use because I already have the first two. We went off around past 10am and went straight to SSS, a good decision because we have to wait for an hour to get it so we can still go to our next agenda. As we got there, the office was already full of people, but the good thing is they don’t have a noon break so the operations don’t stop.

How to get your SSS number:
1. Get an E-1 form at Window 1 and fill it up. Left and right thumbmarks are also needed.
2. Prepare beforehand a photocopy of your birth certificate so as you won’t fall on those overpricing photocopying services around the area. Only 1 copy is needed to be attached with the form upon passing.
3. Then pass it to the guard or to somebody supposed to be in charge for that.
4. Then sit and wait for your name to be called.
-then voila! You have now your SSS number. =]

Next stop: BIR

So we just decided to get back to SSS after lunch and went to BIR instead. We got there around 11:30 and finished the process in just 15 mins. woohoo!

How to get your TIN:
1. Register on their computer database upon entering (I think it’s just a logbook for every visitor)
2. Get an application for registration ( BIR Form No. 1904) and fill up accordingly. Make sure to read the instructions because there are some boxes that is only to be filled up by the BIR agent
3. A photocopy(1) of your birth certificate or any document showing name, address and birthdate of the applicant is also to be passed along with the form.
4. After filling up the form, pass it to the receiving officer in the TIN application lane.
4. then sit and wait for your name to be called.

- voila! You have your 12 digit TIN. =]

After the very fast process at BIR, we went straight to SM Bacoor to have lunch then went back to SSS to get our forms back, and then went straight ahead to LTO. A lot of people were already there when we arrived so most likely we’ll be spending more than an hour there. We finished around 3:30, so it took us more or less 2 hours to finish, not bad.

How to get a student permit:
*this would just serve as a pre guide for those who are just wondering, but LTO offices do have boards posted in their wall showing the step by step instruction for application so it’s not really that confusing.
1. Go to Window 1 to get your application form for student permit and your number to be called in the next window. You will also be asked to prepare a photocopy of your birth certificate to be passed with the application form.
2. Fill up the form accordingly and wait for your number to be called for passing of the accomplished form and photocopy of birth certificate. Then sit back and relax and wait for your name to be called. =]
3. As your name is called, next step would be the picture taking and signature. Tip: Just smile before the camera as long as it takes until the person in charge tells you it’s already time to write your signature, don’t expect for him to count 123. Hehe, I dunno if that’s always the case though.
4. Then wait for your name to be called again to pay for the fee. I forgot the exact amount, but it’s more or less 350php I think?
5. Then sit back and wait again for the last step - getting your newly printed student permit, a small piece of paper smaller in width than a ½ piece of paper. Don’t be confused when the person in the window offers you a jacket/cover for your student permit, in a size intended for a driver’s license, for 20php. I don’t know if that’s only in our place. Don’t buy it for an obvious reason; just place your permit in a proper place, besides it would only be effective for 3 months (as what I can remember).

So that’s it, I feel accomplished. Haha! I hope this would be a help for others out there.

Disclaimer: The following steps stated above may vary on other cities or may change in some circumstances. I'm in Cavite so particularly in Imus and Bacoor branches.

PS: we only did cash out for the “student permit” section, no cash required in getting an SSS number or TIN. Thank you. =]

Wednesday, June 1, 2011

Bayview Park Hotel


We had an overnight stay at Bayview Park Hotel to accompany my tita before she goes back to Canada the next day. I just have to blog about the hotel. ehehe! They surely got nice rooms, though their lobby/waiting area was a bit cramped in. My tita's room was on the 11th floor and their elevators were spacious enough unlike others. For a reasonably affordable hotel like this, I don't expect much about their room facilities, but then it was something better than what I expected. :)

Their key card was a sensor type one where you swipe instead of putting it in like those you do in Bundy clocks. As you go inside, at the right, you'll see the T&B and dresser/cabinet in one room with a Japanese inspired sliding door. yay for that! cute. =] Then the lighting inside was nice. ahaha! I'm a sucker for lighting. The main bathroom has also a separate door inside so you can still do your thing privately while others are brushing their teeth or looking for their clothes in the cabinet. Though the downside, that I often notice from others too, is that their toilet has a very weak flush which you have to push down for about 30seconds or more before it totally flushes everything. Hassle. Plus the shower is not de-tanggable (detachable).


So the room was nice. It was spacious (30 sq. m.) enough for 2 single beds, a bedside table, mini ref, 2 chairs, a dresser and a flat screen cable TV hanged in the corner side of the room. It has a cozy feel and what I liked most was the big curtains hanging in half of the room walls. It makes me think of an instant photoshoot' backdrop. haha! Or like play hide and seek (which I did) behind it cause no one will notice, because behind those curtains is a platform you can sit on while having an emo moment staring outside the window. haha! Though the view outside wasn't that nice, unless you're lucky enough to have your room faced in front of Manila bay. They also have an indoor swimming pool located in their roof deck and a fitness gym, though I don’t know if visitors may use it. Wi-fi connectivity is also available in every room, for a price though (tss! Seriously, till now?). But there’s a Starbucks in the ground floor. According to my Tita their breakfast buffet has a nice variety of food choices that is served in the ground floor in their “hotel cafĂ©” cramped in the left side of the hotel lobby.

So my tita decided to go to MOA to do some last minute shopping for pasalubongs. A taxi ride from Bayview to MOA costs P150, the taxi driver didn't used the meter and offered 200php at first, but hello? anlapit lang kaya! so he settled for 150 even though my mother's (she takes a taxi from Baclaran to her office in Makati for only 100php, see?) still arguing about it, but there's no other taxi so we just agreed. The cost way back went up a bit because the taxi driver added 30php to the meter for the traffic daw. Tss.


Address: 1118 Roxas Boulevard cor.
United Nation Avenue, Manila, Philippines
Trunk Line Number: [+63 (country code)-2 (area code) -2479000 (local number)]
Fax Number: +63-2-5223040
Toll Free Number: 1800-1888-5555
Website: www.bayviewparkhotel.com